Week 1. Introduction to workflow using RStudio and Git
| Compartmentalized | Documented | Extendible | Reproducible | Robust |
Overview
I will introduce you to RStudio and GitHub and show you how to use GitHub without having to learn Git. If you already use RStudio and Git, you can skip this week as this will be introductory level. If you have tried RStudio or Git and gotten frustrated or thought ‘I don’t have time to learn this’, this is for you. If you want to learn how to easily keep track of changes in your code, this is for you. If you have never used RStudio, this is for you.
I’m going to show you how to work with Git/GitHub with no command-line interface using GitHub Desktop. See the More Resources tab above for a nice online workshop on Git/GitHub if you want to learn more. If you want to learn to use Git with RStudio, see the same workshop or my 2020 set-up info.
RStudio
Open RStudio on your computer or on RStudio Cloud. To do the latter, click this link: https://rstudio.cloud/project/2574104
When you open RStudio you will see 4 panels:
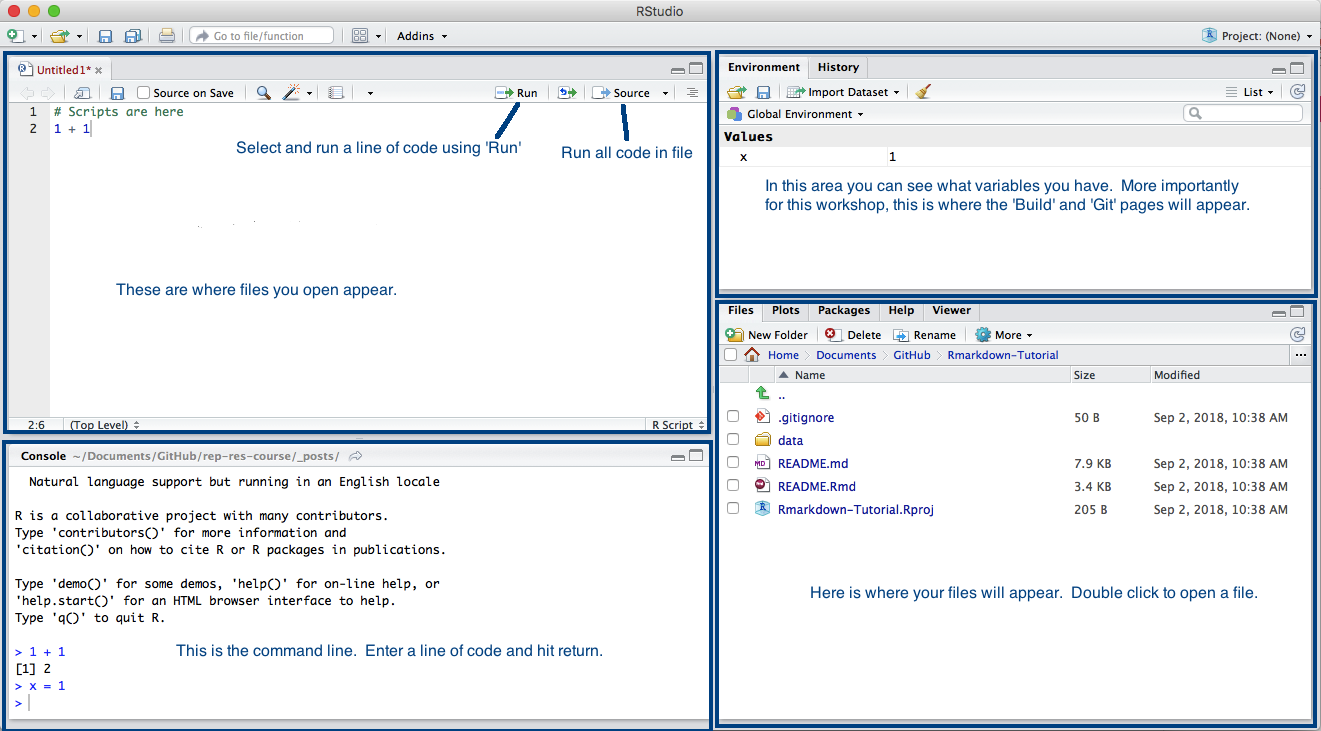
RStudio-panels
Create an RStudio Project
On the desktop app
- In RStudio, choose “File->New Project…”
- Then choose “New Directory” and then choose “Empty Project”
- In the next dialog, choose a name (it is best to use only letters, numbers, dashes, and underscores, and include no spaces in the name).
- Then click “Create Project”.
RStudio-panels
On RStudio Cloud
- On left, click ’Your Workspace"
- Then click New Project (blue button on right)
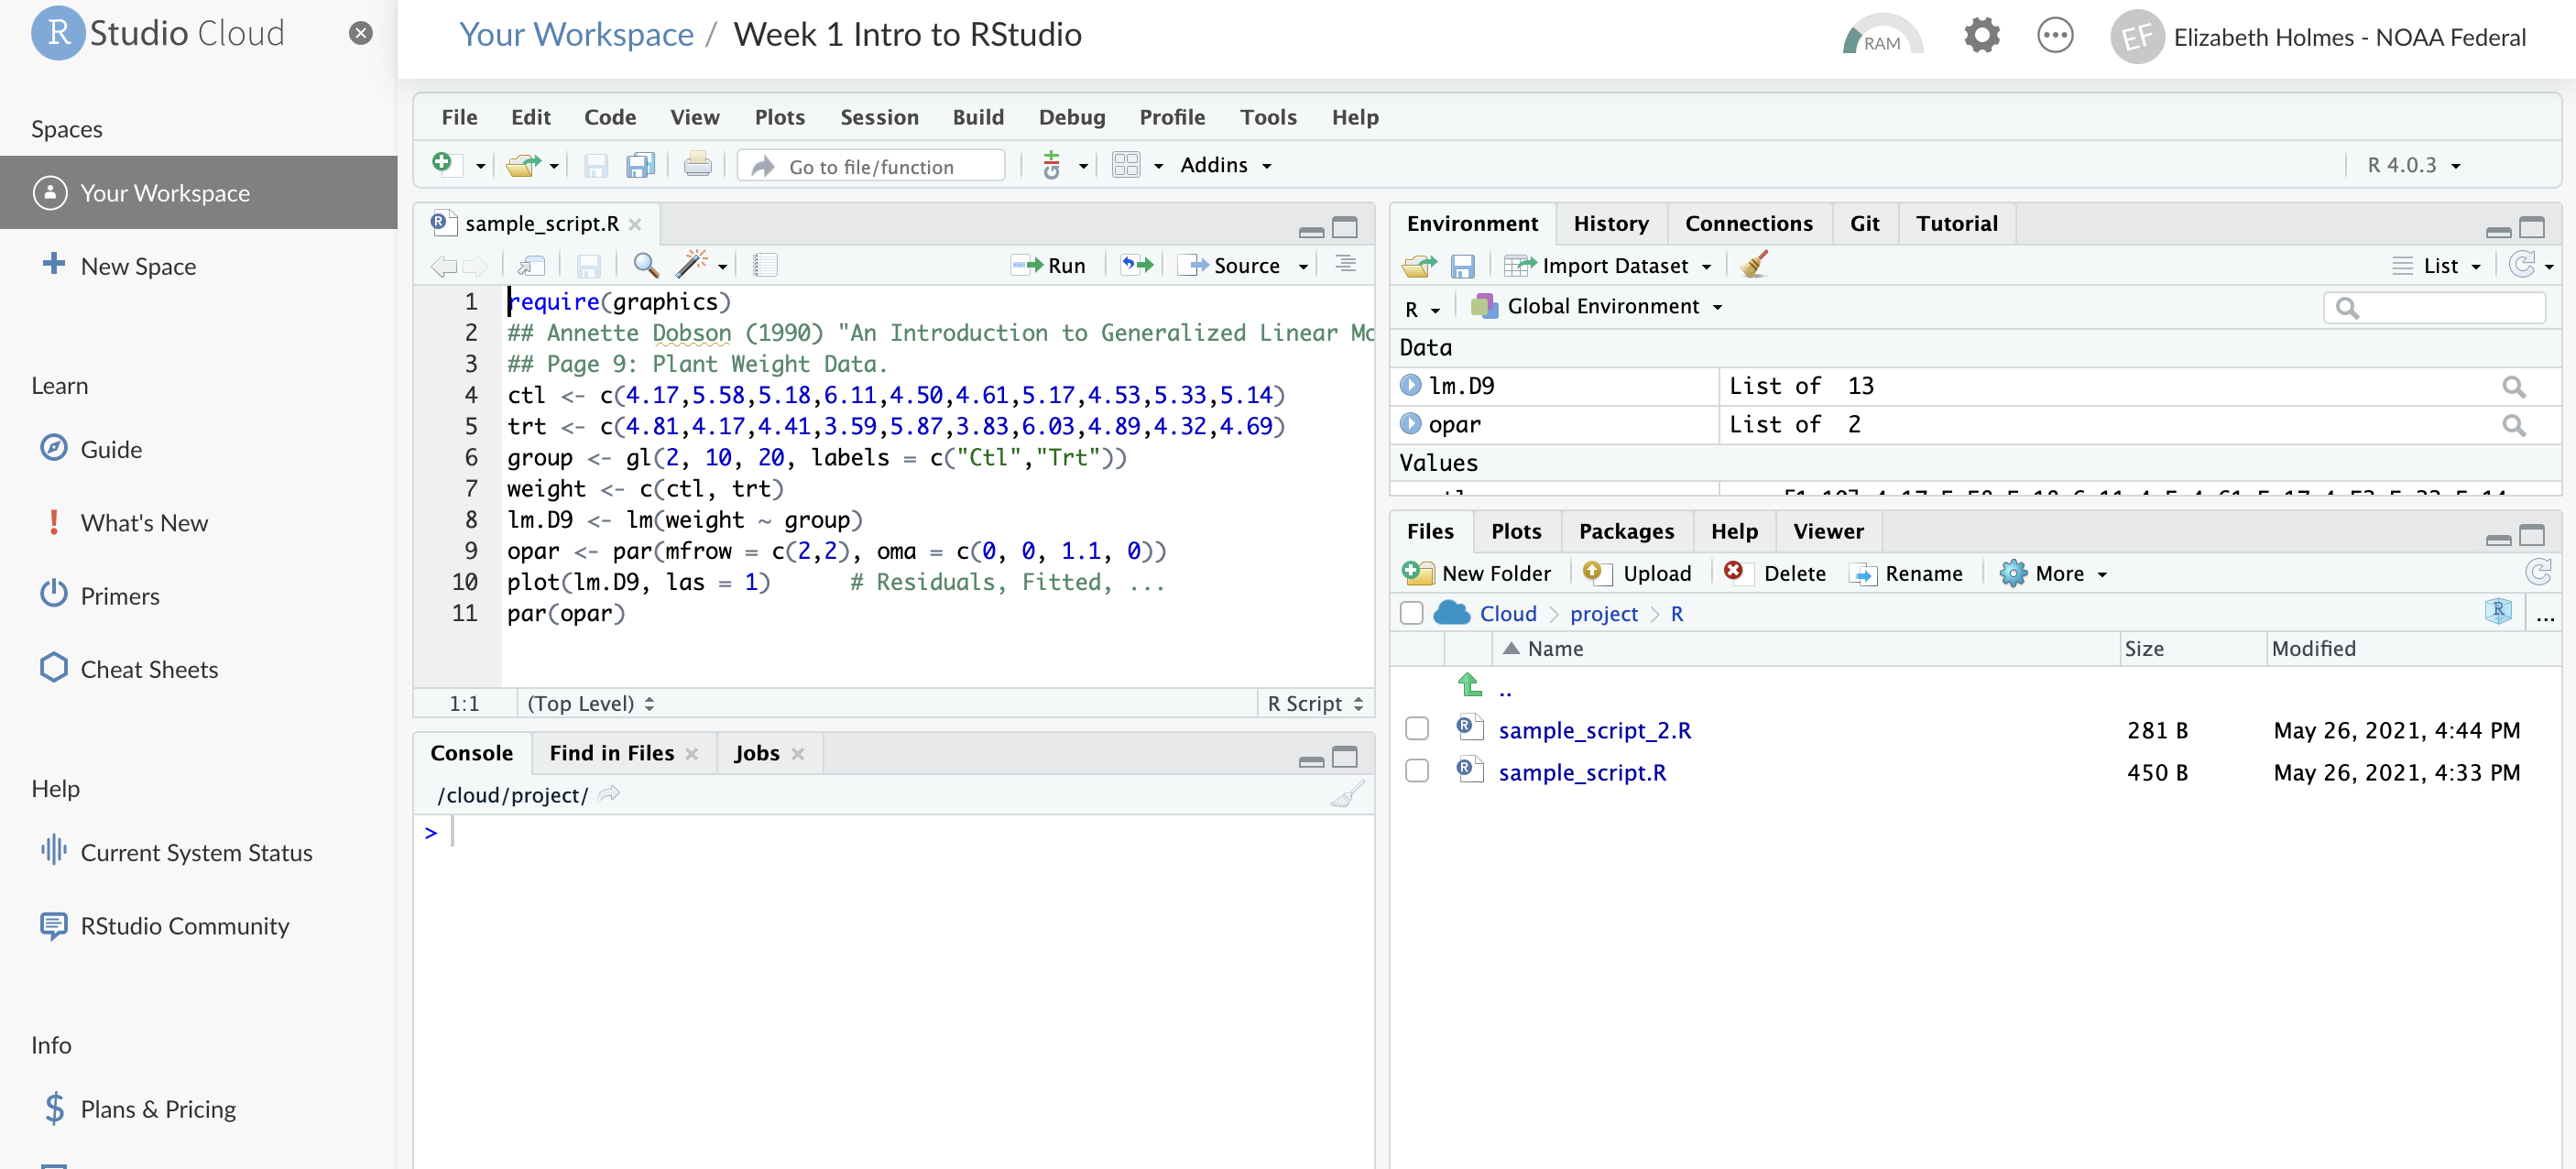
RStudio-panels
Add a new script file
- Add a new file using ‘File > New File > R Script’
- Or you can click the new icon in top left corner.
- Add some code to that file. Copy and paste in:
require(graphics)
## Annette Dobson (1990) "An Introduction to Generalized Linear Models".
## Page 9: Plant Weight Data.
ctl <- c(4.17,5.58,5.18,6.11,4.50,4.61,5.17,4.53,5.33,5.14)
trt <- c(4.81,4.17,4.41,3.59,5.87,3.83,6.03,4.89,4.32,4.69)
group <- gl(2, 10, 20, labels = c("Ctl","Trt"))
weight <- c(ctl, trt)
lm.D9 <- lm(weight ~ group)
opar <- par(mfrow = c(2,2), oma = c(0, 0, 1.1, 0))
plot(lm.D9, las = 1)      # Residuals, Fitted, ...
par(opar)
Run the code
- Select all the lines of code and select ‘Run’
- Run all the code by selecting ‘Source’
Project organization
Keep your projects in separate folders with a uniform set of folder names. For example,
- R - your R code
- data - your data files
- output -
- inst - random stuff
- notes -
Project settings
One tip is to not save your .Rdata (your environment) when your are done for the day. Under Tools > Project Options… > General
Super helpful features
- Edit > Find in Files…
- Code > Comment
- Code > Reindent Lines
- File > New (templates)
- History tab
- Help tab (index at bottom)
- Help > Markdown quick reference
- Tools > addins Use with the stylr and spelling package
More exercises
R for Data Science is a great book to introduce you to working with data in R. Read through the following sections of the R for Data Science book and work through the examples.
- Workflow basics: super basic review on how R works.
- Workflow: projects: info about organizing RStudio projects.
- Workflow: scripts: how to evaluate code in scripts.
Git (GitHub/GitLab)
Tracking your code (and project) changes. Today, I am focusing on Git for individuals not teams. If you aren’t using a change tracker (version control) already, then start just with a personal project and track only your changes. I also will not cover branches today.
Basics
- Repo: Repository. It is your code and the record of your changes. In a hidden folder called
.git(so if you wanted to get rid of the history and other Git info, you could delete that folder). You have a local repo and a remote repo (on GitHub/GitLab). - Actions: Commit, Push, Pull
- Git: The program that keeps track of the changes on local and remote(“origin”) repo.
- Git GUIs: A graphical interface for Git (which is command line). There are many. I am teaching an easy-entry one, GitHub Desktop.
One-person Workflow (to get started):
- Make local changes to code.
- Record what those changes were about and commit to the code change record (history).
- Push those changes to your remote repository (aka origin)
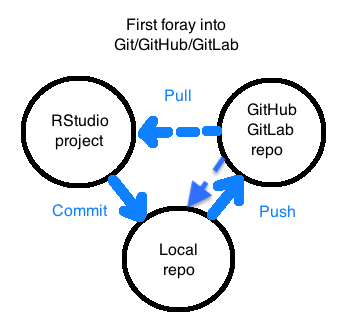
First foray into Git
Goals today:
- Get you started.
- Show you a simple workflow.
- Show some simple GitHub features.
Let’s get started!
I am going to show a workflow that is usually robust. Connecting Git on your computer and GitHub is a source of much misery, and in my experience creating the repo on GitHub first eliminates the problems. This really important for the first time you connect your computer to the remote repository server (GitHub).
Make a GitHub Repo
New repo
- Go to GitHub and create a new repository (the + in the top right)
- Click add Readme.md and add .gitignore (type R to get the R .gitignore)
- Copy the url of your new repo
Clone the GitHub repo to your computer
In the lecture, I showed this step using RStudio. I forgot that you have to tell RStudio where git.exe is for this to work. See these instructions for doing what I did in lecture (around minute 39). In Week 2, I switched to doing this with GitHub Desktop. That is the workflow I recommend when you get started. I have updated the notes to that workflow.
- Open GitHub Desktop
- Click File > Clone Repository…
- In the popup window, click the URL tab to the right and paste in the url from step 3 above.
- Double check that you have the right folder for the Local Path. I keep all my repositories in Documents/GitHub so they are easier to find. Click Clone.
Create an RStudio project from this new folder
- Open RStudio and click
New Project(upper right, blue cube with R) - Click New Project… > Existing Directory
- Navigate to the folder you just cloned from above and click ‘Create Project’
Now you are ready to make some changes, commit them and push up to GitHub.
See these links if you want to do the cloning step from within RStudio Desktop or RStudio Cloud.
Make some changes and commit
Make a change
- In RStudio. Add a file. File > New File > R Script
- Type something and then save the file.
Now add a note and push to GitHub
If you are doing this from your computer:
- Switch to GitHub Desktop.
- Click the changes that you want to commit (check the little checkbox next to the file). Add a comment: first line is subject, newline, description (options). And click
Commit. - Click the Green up arrow to Push to GitHub.
If you are on RStudio Cloud:
Make sure you have RStudio Cloud set up to use Git.
- Click the Git tab.
- Click Commit.
- Click Push, the first time you do this, it will ask for your your GitHub user name and password. Hopefully you only have to do this once. Note: you may get an email from GitHub complaining about accessing GitHub via password. Ignore but accessing GitHub from RStudio may stop working in the future.
Make some changes and look at the history
- Repeat 1-4 a few times.
- Now look at the history. Just click the History tab in GitHub Desktop.
- Push changes up the GitHub
Go to GitHub to see your changes there
- Go to your repo on GitHub
- Refresh the page and you should see your changes
Using Git to track personal changes w/o posting to remote repo
- In GitHub Desktop, click File > Add local repository. Choose ‘create repository’ when it asks.
- Don’t publish to GitHub.
Copy someone’s else repo to your GitHub account
Don’t Fork. That would be if you are contributing to their repo. If you just want to copy it and then adapt it for your purposes, do this.
- In a browser, navigate to the repository that you want to copy. For example: https://github.com/RVerse-Tutorials/Test.
- Copy its url.
- Open GitHub and go to your account. So for me, I would go to github.com/eeholmes because my account is eeholmes.
- If using GitHub, click the
+in top right and clickimport repository. Paste in the url and give your repo a name. - Now that you have the url of your own repo, the steps to clone it to your computer as the same as before.
Key tips
Avoid making changes on GitHub directly—until you are a bit more experienced. Why? Because you’re more likely to create merge conflicts. See the week 2 material for how to fix a merge conflict.
Do not use branches (wait till you are more experienced with Git).
Do not use Git at the command line. Wait until you are much more experienced (and even then you rarely have to go to the command line).
If you use Dropbox or iCloud on multiple computers to keep folders synced up across different computers, don’t put your GitHub repos in those folders. Conflicted files are very likely if you ever work-offline.
The Git info is in the hidden folder
.git. If you need to get rid of the repository data (like history), delete that. Don’t copy that folder into another repo. The remote url is in.git/configif you need to check it.
Working the Git from RStudio on your desktop
Pushing/Pulling to GitHub from RStudio is a hassle because there are many steps to getting the credentials (passwords) properly communicated. These steps are operating systems dependent and can especially be a hassle if you don’t have admin access on a PC.
However, you can clone repositories from GitHub and commit your changes (without pushing to GitHub) without having to do credentials. All you need to do is tell RStudio where git.exe is on your computer.
Telling RStudio where git.exe is
- Open RStudio
- Click Tools > Global Options
- Click Git/SVN on the left
- Click the little check box at the top
- In the Git executible box, paste in the location of
git.exe
- On a Mac? It is at
/usr/bin/gitJust paste that in. - On a PC? Look (by opening a finder window) in the following places. Try the GitHubDesktop one first.
- C:/Program Files/Git/bin/git.exe
- C:/Users/your.username/AppData/Local/Programs/Git/bin/git.exe
- C:/Users/your.username/AppData/Local/GitHubDesktop/app-2.8.3/resources/app/git/cmd/git.exe
- Restart R. Session > Restart R…
Note AppData is a hidden folder, so click View and then click the ‘hidden files’ checkbox if you don’t see it in your Users folder.
Add the new repo to RStudio
- Open RStudio and click
New Project(upper right, blue cube with R) - Click New Project… > Version Control > Git and paste in the url. Give your project a name and make sure the directory is where you want the project.
- Open GitHub Desktop: File > Add Local Repository. Then navigate to the new folder so GitHub Desktop knows about the repo.
- Done!
Clone a repo from GitHub into RStudio Cloud
Open RStudio Cloud and click ‘Your Workspace’ on left
Click New Project > New Project from Git Repository. Paste in the url.
In your project, click the Terminal tab (bottom left). Type ``` git config –global user.email “you@email.com”
git config –global user.name “your name” ``` I think you only do this once.
Done! Now you can commit and push from the Git tab.
NOAA Specific Info
For NOAA staff, GitHub can be used for publishing public projects: NOAA GitHub and a NWFSC example NWFSC Timeseries. NWFSC has a GitHub internal server if you want a repository server for your non-public projects and for internal collaboration.