This will show you how to make a very simple website with R Markdown and put that online via GitHub Pages. When you are ready to learn more go to the Links page for more tutorials.
Download a template
Go to the RVerse-Tutorials-Website repository and click the Fork button in the upper right. You will need to be logged into your GitHub account.
Or you can download a zip file of the repository. To do the latter, you can use the ‘download zip file’ button on the GitHub repository or you can navigate to your ‘RWorkflow’ folder in RStudio and click ‘More’ in the Files panel and select ‘Set as working directory’. Then issue these commands.
index.Rmd is just your landing page. You can have as little or as much content as you want here. When readers click on your site, they will see this page first.
A minimal index.Rmd would look like:
---
title: "My website"
---

Here is my website.
Content
You can now add as many Rmarkdown files as you want for your content. Each one will be processed into an html file. For example in Test Website, we have two files, about.Rmd and contact.Rmd. Your Rmd files should have the yaml at top and then your Rmarkdown content.
Here is a simple example.
---
title: Simple Rmd File
---

Here is a simple file.
about.Rmd is a fuller Rmd file with R code and figures.
If you want the file linked to in your top nav bar, then add it to _site.yml.
First you need to add this as a repository on GitHub.
Open GitHub Desktop and select File > New Repository. Type ‘Test-Website’ (or if you renamed it, then whatever you renamed it to). Leave everything else blank (for now).
This adds your repository to GitHub Desktop. Now click ‘Publish’ in the top right corner. If ‘private’ is checked, uncheck that.
Next you need to open your repository on GitHub and set it up to serve a webpage.
Go to your GitHub account.
Click on the new Test-Website repository.
Click on Settings.
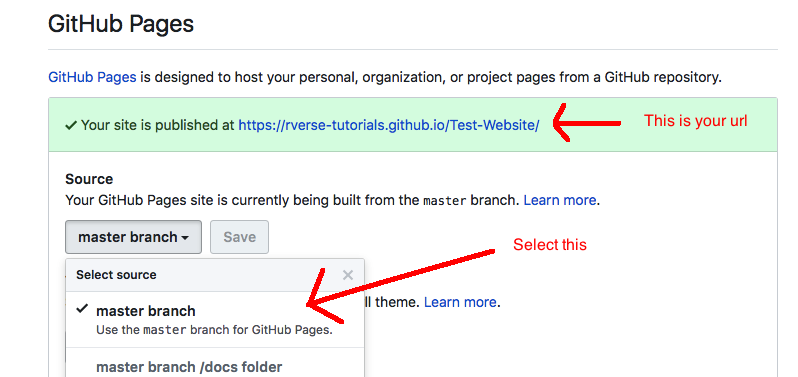
Scroll down to GitHub Pages and change source from ‘none’ to ‘master branch’.
Wait a few minutes and then go to your new webpage. The link will appear just above where your changed the source.
Extras
Table of Contents
If you want to see table of contents for your Rmd files, you specify toc properties in your _site.yml file.
and specify toc: true in your yaml at the top of your Rmd file.
output:
  html_document:
    toc: true
See the about.Rmd file for an example.
Themes
Your _site.yml file has a line that specifies the theme.
output:
  html_document:
    theme: readable
The following are automatically available to you: bootstrap, cerulean, cosmo, flatly, journal, lumen, paper, readable, sandstone, simplex, spacelab, united and yeti. Try changing the theme to one of these and rebuilding your website.
You can download other bootstrap css files and put in site_libs if you want other themes. Do a search for ‘bootstrap themes free’.
Icons
You can easily add icons to your navigation tabs. The icon: line specifies the icon. See the FontAwesome website for icons available. Put fa- in front of the name. For example a photo icon would be specified fa-picture-o.
And then add a styles.css file to your folder. You can change all the h1 headers to green.
h1 {
  font-color: green
}
Change the font-family and add some more space.
body {
    font-family: "Helvetica Neue",Helvetica,Arial,sans-serif;
    line-height: 2;
}
Add more spacing between the sections.
.section {
   padding-bottom: 2em;
}
Etc, etc, etc, etc.
Fixing a navbar that wraps
The bootstrap css doesn’t handle navbars with many tabs very well. It wraps and covers up the text. Adding the following to your styles.css file will fix that.
/* Need to adjust the navbar behaviour so the navbar doesn't wrap */
.navbar-nav {
  position: fixed;
  left: 150px;
  width: 700px;
}

.navbar-header {
  position: fixed;
  left: 30px;
  width: 97%;
}