Week 1. Introduction to workflow using RStudio and Git
| Compartmentalized | Documented | Extendible | Reproducible | Robust |
Overview
I will introduce you to RStudio and GitHub/GitLab I will show you a variety of approaches for organizing your projects that involve code and show you how to use GitHub/GitLab without having to learn Git. If you already use RStudio and Git, skip this week as this will be introductory level. If you have tried RStudio or Git and gotten frustrated or thought ‘I don’t have time to learn this’, this is for you. If you want to learn how to easily keep track of changes in your code, this is for you. If you have never used RStudio, this is for you.
I’m going to show you how to work with Git/GitHub/GitLab with no command-line interface. The goal is to futz with Git as little as possible. See the Links tab above for a nice online workshop on Git/GitHub if you want to learn more.
RStudio
When you open RStudio you will see 4 panels:

RStudio-panels
Create an RStudio Project
- In RStudio, choose “File->New Project…”
- Then choose “New Directory” and then choose “Empty Project”
- In the next dialog, choose a name (it is best to use only letters, numbers, dashes, and underscores, and include no spaces in the name).
- Then click “Create Project”.
That should give you a new project.
Add a new script file
- Add a new file using ‘File > New File > R Script’
- Or you can click the new icon in top left corner.
- Add some code to that file. Copy and paste in:
require(graphics)
## Annette Dobson (1990) "An Introduction to Generalized Linear Models".
## Page 9: Plant Weight Data.
ctl <- c(4.17,5.58,5.18,6.11,4.50,4.61,5.17,4.53,5.33,5.14)
trt <- c(4.81,4.17,4.41,3.59,5.87,3.83,6.03,4.89,4.32,4.69)
group <- gl(2, 10, 20, labels = c("Ctl","Trt"))
weight <- c(ctl, trt)
lm.D9 <- lm(weight ~ group)
opar <- par(mfrow = c(2,2), oma = c(0, 0, 1.1, 0))
plot(lm.D9, las = 1)      # Residuals, Fitted, ...
par(opar)
Run the code
- Select all the lines of code and select ‘Run’
- Run all the code by selecting ‘Source’
Project organization
Keep your projects in separate folders with a uniform set of folder names. For example,
- R - your functions
- scripts - scripts (so not functions)
- data - your RData files
- output -
- inst - random stuff
- notes -
The top right corner allows you to create projects and switch between projects.
RStudio-panels
Project settings
Key one is to not save your .Rdata (your environment) when your are done for the day. Under Tools > Project Options… > General
Super helpful features
- Edit > Find in Files…
- Code > Comment
- Code > Reindent Lines
- File > New (templates)
- History tab
- Help tab (index at bottom)
- Help > Markdown quick reference
More exercises
R for Data Science is a great book to introduce you to working with data in R. Read through the following sections of the R for Data Science book and work through the examples.
- Workflow basics: super basic review on how R works.
- Workflow: projects: info about organizing RStudio projects.
- Workflow: scripts: how to evaluate code in scripts.
Git (GitHub/GitLab)
Tracking your code (and project) changes. I am focusing on Git for individuals not teams. If you aren’t using a change tracker (version control), then start just with a personal project and track only your changes. I will not cover branches.
For NOAA staff, GitHub can be used for publishing public projects: NOAA GitHub and a NWFSC example NWFSC Timeseries. NWFSC has a GitLab server if you want a repository server for your non-public projects and for internal collaboration.
Basics
- Repo: Repository. It is your code and the record of your changes. In a hidden folder called
.git(so if you wanted to get rid of the history and other Git info, you could delete that folder). You have a local repo and a remote repo (on GitHub/GitLab). - Actions: Commit, Push, Pull
- Git: The program that keeps track of the changes on local and remote repo.
- Git GUIs: A graphical interface for Git (which is command line). There are many. I am teaching an easy-entry one, GitHub Desktop.
Workflow (to get started):
- Make local changes to code.
- Record what those changes were about and commit to the code change record (history).
- Push those changes to your remote copy (aka your backup)
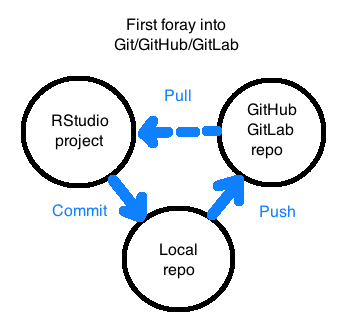
First foray into Git/GitHub/GitLab
Goals today:
- Get you started.
- Show you a simple workflow.
- Show some simple GitHub/GitLab features.
Let’s get started!
I am going to show a workflow that is usually robust. Connecting Git on your computer and GitHub (or GitLab) is a source of much misery, and in my experience creating the repo on GitHub (or GitLab) first eliminates the problems. This really important for the first time you connect your computer to the remote repository server (GitHub or GitLab). Start with a new repo created on GitHub or GitLab.
Make a GitHub or GitLab Repo
- Go to GitHub or GitLab and create a new repository (the + in the top right or New Project)
- Click add Readme.md and add .gitignore (type R to get the R .gitignore)
- Copy the url of your new repo
Add to RStudio
- Open RStudio and click
New Project(upper right, blue cube with R) - Click New Project… > Version Control > Git and paste in the url. Give your project a name and make sure the directory is where you want the project.
- Done!
Make some changes and commit
- Add a file. File > New File > R Script
- Type something and then save the file.
- Click the
Gittab in the upper right. - Click the changes that you want to commit (do all). And click
Commit. Add a comment: first line is subject, newline, description (options). - Click the Green up arrow to Push to GitHub or GitLab.
Make some changes and look at the history
Repeat 1-4 a few times.
Now look at the history. The little clock-like icon (or History in the Git window).
- Click on
filter by fileto see just the changes to one file. - Do a search in the upper right.
- Click on an early commit and click
View file @...
- Click on
Push changes up the GitHub or GitLab
Copy someone’s else repo
Don’t Fork. That would be if you are contributing to their repo. If you just want to copy it and then adapt it for your purposes, do this.
- In a browser, navigate to the repository that you want to copy. For example: https://github.com/RVerse-Tutorials/Test.
- Copy its url.
- Open GitHub or GitLab and go to your account. So for me, I would go to github.com/eeholmes because my account is eeholmes.
- If using GitHub, click the
+in top right and clickimport repository. Paste in the url and give your repo a name. - If using GitLab, click
New Projecton right, thenImport Repositorytab, then clickRepo by URL. Paste in url and give repo a name. - Open RStudio and click the project tab in the top right and select,
New Project. Then selectVersion Controland paste in the url of your repository’s url. For example,https://github.com/<youraccount>/Testorhttps://gitlab.com/<youraccount>/Testor - Add the new repo to GitHub Desktop. Open GitHub Desktop, select File>Add Local Repository and navigate to the folder with the new repository.
Key tips
- Do not make changes on GitHub or GitLab directly.
- Waa, I did and then I forget to pull and now I have merge conflicts. What do I do?? I warned you. Now, go to the Week 7 material to learn how to deal with merge conflicts.
Do not use branches (wait till you are friends with Git).
Do not use Git at the command line.
If you use Dropbox or iCloud on multiple computers to keep folders synced up across different computers, don’t put your Git repos in those folders.
The Git info is in the hidden folder
.git. If you need to get rid of the repository data (like history), delete that. Don’t copy that folder into another repo.Start by making a blank repo on GitHub or GitLab and select the box to add a Readme file. Then clone that with RStudio or GitHub Desktop.
GitHub Desktop
Despite the name, it works with GitLab too.
You can commit your changes and push them with RStudio only, but many people use a Git GUI to interact with Git and their remote repository. GitHub Desktop is simple and works well. Why not just use RStudio? If you are happy with that, fine. Many people prefer a separate Git GUI, though Git with RStudio has improved and serves many just fine.

GitHub Desktop
Adding your local repository
To use your local repository with GitHub Desktop, you need to add it.
- File > Add Local Repository.
How does it know what the remote repository (GitHub/GitLab) is? It is stored in the .git information which was set when you cloned the repo from GitHub/GitLab.